Thursday, December 21, 2006

Quick Tips for Christmas Pics

Christmas is coming up soon, and everyone with a camera will want to take pictures of the festivities. Think of this as your assignment for the week.

Here are just a few tips:

- Don't take pictures of people unwrapping their gifts--take pictures of their faces when they see what they're unwrapping. You'll want to get the gift and the torn wrapping paper in the image as well to put it in context, but remember that the important thing is the emotion. Be ready at the exact moment of realization, because it's short. If you're using any automatic features, especially automatic focus, frame the image and hold the shutter button partway down until your camera figures out what it needs to do. That way you can finish pressing the button at the right time.

- For placement of faces in the image, don't forget everything you know about composition. Re-read the article on the golden ratio if necessary, because you'll want to put faces on a powerpoint (or cradle, in golden triangle terms).

- Try to get at least one picture of everyone present, but you don't necessarily want to pose them. Get as many people in each frame as you can, and try to make sure the Christmas tree is in the picture too.

- Take pictures before any of the presents are unwrapped, so you get all the wonderful colors and bows and so forth. Take pics of just the presents, presents and trees, presents and the people anticipating their chance to unwrap them (but with these last ones, again the emotion is paramount). Take pictures throughout the event, and make sure to get pictures of the wrapping paper carnage before it's all cleaned up.

- If there are kids around, take pictures of them playing with their toys before the wrapping paper is thrown out.

- You don't need to get a picture every time a gift is unwrapped. Sometimes it's best to take a picture of someone else who's watching another person unwrap a gift. They'll be less suspecting of the camera, so it's a great opportunity to get a candid shot.

- Look for strange angles. Maybe you can lay down under the Christmas tree after the presents have been removed. Or maybe you can sneak behind someone while they're opening their gifts to give the viewer of the image the feeling that they are the ones opening the presents. The possibilities are endless.

- Don't forget that you're a part of the family or circle of friends, too. Don't let your hobby as a photographer get in the way of having a good time and being with your loved ones.

- And last, but not least, don't forget the true meaning of Christmas.


(Painting by Giovanni Battista Pittoni, 1687-1767)

Friday, December 15, 2006

Opposing Viewpoints

Actually, I'm not all that interested in the subject of photography. Once the picture is in the box, I'm not all that interested in what happens next. Hunters, after all, aren't cooks.
--Henri Cartier-Bresson
The negative is the equivalent of the composer's score, and the print the performance.
--Ansel Adams

Wednesday, December 13, 2006

Alfred Stieglitz Quote

No assignment this week, as I am far too busy (graduation and anniversary within two days of each other). Instead, take the time to catch up a bit and reflect on the following:
Let me here call attention to one of the most universally popular mistakes that have to do with photography - that of classing supposedly excellent work as professional, and using the term amateur to convey the idea of immature productions and to excuse atrociously poor photographs. As a matter of fact nearly all the greatest work is being, and has always been done, by those who are following photography for the love of it, and not merely for financial reasons. As the name implies, an amateur is one who works for love; and viewed in this light the incorrectness of the popular classification is readily apparent.
--Alfred Stieglitz

(Alfred Stieglitz is widely regarded as one of the most important figures in the history of photography, not because he made any technological advances, or even because of his own respectable body of photographic work, but rather because he did much to promote photography as an art form. He is also well known for having been married to Georgia O'Keefe, although they didn't live together most of the time and were both known to be unfaithful to each other.)

Monday, December 11, 2006

Winter Photography

Taking pictures of wintery landscapes can be a lot of fun, if you don't mind the cold, and the results can be quite beautiful. But there are a few things you should know.

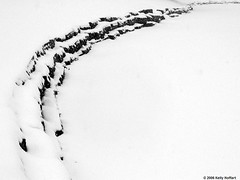
When your camera's light meter takes a reading, it assumes that your scene has an average range of tones. But in fact, your winter landscapes will be mostly white, thereby fooling your camera's light meter. So you'll end up with this:

When your picture should look like this:
Untitled

Now, sometimes this will be OK and you can fix it in Photoshop. But it's always best to do it right in the first place--or at least get it closer to being right. One thing you can do is to use a gray card. A gray card, which should be available at any photography specialty store, is a card that is precisely 50% gray. If you point your camera at it in your current lighting situation, you can get a light meter reading which you can then use when you take your shot.

EXTRA TIP: You could make your own gray card very easily. Just point your camera at something that's completely white, let it take its own exposure reading, and snap the picture. Then print this picture off as a 5x7 and take it with you as a gray card!

Alternatively, you could just set your exposure compensation to overexpose all your shots by about 2/3 to 1 2/3 stops. Experiment to find the right setting.

Another problem with digital cameras and auto-white balance is that many of your pictures will come out with a blue cast to them, at least on days with a clear sky. You could try messing around with custom white balances, but that's a pain. Personally, I think this issue is probably easier dealt with in Photoshop. But your camera may have a special mode dedicated to snowy scenes, as mine does. This mode may also compensate for the exposure issues mentioned above.

So when the snow starts falling, get out there and shoot, but remember that snow will trick your camera almost every time, if you don't outsmart your camera first.

Friday, December 08, 2006

Different Viewpoints

"I never question what to do, it tells me what to do. The photographs make themselves with my help."
--Ruth Bernhard

"You don't take a photograph. You ask, quietly, to borrow it."
--Author Unknown

"You don't take a photograph, you make it."
--Ansel Adams

Wednesday, December 06, 2006

More on Toning

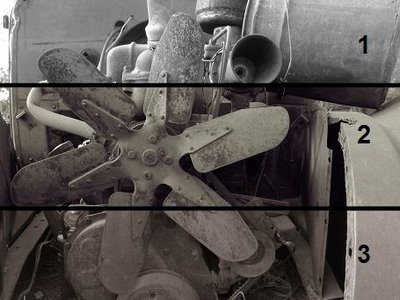
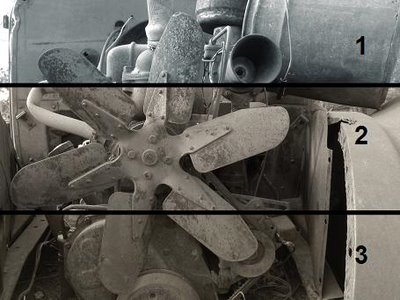
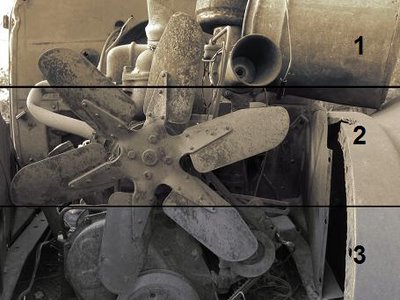
Instead of an assignment this week, I want to go more into toning images. I began this discussion with How-To: Split Toning. Those methods worked very well, but I felt that I was limited by the variations command. So I've done some more research.


1: Original
2: Quadtone
3: Selenium

This article will teach you how to do each of these adjustments, and more.

This article was a big help. He suggests using curves to achieve the toning effects, and he also notes that you can save your curve adjustments. To get to curves, you can either go to Image > Adjustments > Curves or to Layer > New Adjustment Layer > Curves. There is a dropdown menu there which will let you pick individual color channels, i.e. red, green, and blue. This will normally take a lot of experimentation, but when you're finished you can click on "Save" in the Curves dialog and it will allow you to save the exact effect you've used here to use it again another day.

But if you're impatient, or you just want to be smart and use what others have done as long as they've done it well, you might want to use Curves files that others have created. That page has a zip file available with eight different Curves adjustments, including a selenium tone (which is what I was originally looking for and led me to that page), a nice-looking subtle sepia-like tone (which he calls Rustica1), and others. (By the way, I believe Ansel Adams was known for using selenium tones.)


1. Thomas Niemann Tones Silver
2. Denny Wagner Platiunum
3. Ken Lee Bronze Balanced


Rustica 1, Rustica 2, and Rustica 3

You can find other files which will allow you to do the same kinds of things on The Photoshop Action Exchange. There are also many other actions available there (such as one that mimics infrared film, but I had trouble with that one) for you to peruse. To use an action, you must go to your actions palette (hit the actions tab in your history palette). To load one you've saved, click the menu (the little tiny circle with the arrow) and click "Load Action." Then click on the action you want and press the Play button.

Using Curves is probably the most sophisticated method for toning a photo. But there are others. This article explains one of them. You may have to go to Image > Mode > Greyscale, and after that you must go to Image > Mode > Duotone. From here you can select Duotone, Tritone, or Quadtone. Select a tone that sounds good, and try it out. If you don't like it, hold down Alt and then click on Reset. Once you find one you like, choose it and you can adjust the curves if you want. After you're done with this method, you'll have to go back to Image > Mode > RGB if you want to save it in JPG format.

But remember that toning will never make a bad image into a good one. It can only enhance already good pictures or bring out the hidden potential of latently good images.
You sepia tone a bad print, and what you get is a bad sepia toned print.
--Linda Cooley

Remember that when you've tried these methods out, you should share them with the group!

Monday, December 04, 2006

Camera Types and Parallax Error

When you're looking to purchase a camera, you'll need to know a little bit about different camera types. Some cameras will let you see exactly what your camera sees, and exactly what will appear on the film or digital image file. Other cameras will not.

The difference between what some cameras show you through the viewfinder and what the picture will actually look like is called parallax error. Some cameras that suffer from this problem will have marks in the viewfinder that will give you a good idea about how to adjust for this problem. Usually it's not a huge difference, but when you're doing up close (or macro) shooting, parallax error is an insurmountable hurdle.

Point-and-Shoot Cameras

Point-and-shoot (or PnS, P'NS, PNS, etc.) cameras are what your average person that's not serious about photography will have. They do everything automatically for you, and generally you can't override its automatic functions. They're popular because they're cheap, compact, and easy to use. But the viewfinder is a very simple piece of glass--and these cameras suffer from parallax error.

However, with a digital point-and-shoot camera, you will have the benefit of the LCD screen. This screen will show you exactly what your camera sees. In other words, it doesn't suffer from parallax error. So if you're using a digital point-and-shoot, remember to always use the LCD screen, not the viewfinder.

Twin Lens Reflex Cameras

A twin lens reflex (or TLR) camera, like my new toy the Yashica MAT 124, also suffers from parallax error. These cameras have two lenses of identical focal length placed one above the other. The top lens is the one that shows you what you see in your viewfinder, and the bottom lens is the one that exposes the film. Focusing is not a problem because they are both connected to the same focusing mechanism, and are synched up by the manufacturer.

Aside from parallax error, TLRs also suffer from a reversal of the image in the viewfinder, although this is not a big problem once you get used to composing images with the camera.

A positive attribute of a TLR is that the viewfinder doesn't go blank when you're taking a picture. However, this advantage is limited in practice because of the image reversal and the fact that it's only really helpful when taking action shots. Some TLRs attempt to make up for this by including a "sports finder," which is essentially just the same thing as a PNS viewfinder (which generally won't hide your view while snapping a shot), so it doesn't take advantage of this factor.

Single Lens Reflex Cameras

A single lens reflex (or SLR) camera is the weapon of choice for most professionals and serious amateurs. These cameras do not suffer from parallax error. This is because the same lens that exposes the film is also the lens that shows you what you see with the viewfinder. They do this because of a mirror that moves out of the way as the shutter is released. This can cause problems because it causes slightly more camera shake and it is quite noisy, but the advantages it gives are very much worth it.

SLRs are also favored because of their quality and adaptability (through various accessory lenses and filters, among other things).

Rangefinder Cameras

A rangefinder camera is an unusual thing these days. They were popular particularly in the 1950's, and some higher end (esp. Leica) models are still popular today. Earlier models would tell you what distance the subject is from the camera and allow you to set the lens's focus to that distance. More recent models will show you two images in the viewfinder, and you turn the focusing ring until they match perfectly.

The problem is, though, that the viewfinder is separate from the camera's lens, and so these cameras also suffer from parallax error--and this factor contributed largely to their fall from popularity (superseded by SLRs). Most will have some mechanism for correcting parallax error, but these are not effective at close distances.

Conclusion

For almost every pro and serious amateur, an SLR is the camera of choice. But other camera types still have their place. As long as you're not getting in too close to your subject a TLR or rangefinder camera can give you superb results. PNS cameras are also good because they're cheap and can be taken places that other cameras can't--and they're less likely to be stolen, for a number of reasons (less valuable, easier to keep close to yourself, and less obvious/tempting). And with the LCD screens on today's digital cameras, even a cheap camera can let you avoid parallax error.

Friday, December 01, 2006

Jonathan Bailey Quote

This guy's view of photography is much like my own:
I use photography as a point of departure. Like Frederick Sommer, I prefer to view a photograph as "a thing seen" in its own right, rather than considering it as a document of "a thing seen." This is a disengagement from viewing a photograph for its content alone. An image has its own reason for being, perhaps possessing its own kind of intelligence.
--Jonathan Bailey, in Camera Arts Feb/March 2001