Sunday, May 09, 2010

Update

I have to apologize for failing to update this blog in 2 and a half years. My son is turning 3 soon, so you can imagine that he is the main reason I have little time for photography anymore.

I still post new photos from time to time at my main blog, Full Metal Attorney. Even though most of them were taken quite a while ago, the quality is still good (they're not leftovers).

If I ever get more time to dedicate to photography again, I intend to come back to providing useful information in this blog. In the meantime, it will remain up, and will be a useful resource. You can check the site index to browse, or simply go back through the archives.

I just hope you have more time to shoot than I do.

Sunday, December 02, 2007

How-To: Use Blend Modes for Effect

Sometimes you'll see black and white photos with an unusual feel to them, and you'll no doubt wonder how they did that. Many times, the answer is that they used layers and blend modes in Photoshop. This is how it's done. The same method can be used with color photos, but I find that it's more applicable to black and white images.


First, open your picture in Photoshop.


If it's not already black and white, convert it using your favorite method. See "I Hate Hue" for one such method. On this picture, I used the Channel Mixer (Image > Adjustments > Channel Mixer), clicked on monochrome, and went with 0% red, 100% green, 0% blue.


The next step is to create a new layer identical to the background. Go to Layers > Duplicate Layer.


Then go to your layers palette to select your blend mode. Make sure your new layer is selected. Click on "Normal" to see the different blend modes. You could keep clicking and picking, but since you won't know what blend mode will look the best, I just click it twice and then press the down key to cycle through them until I find one I like.

Often, the Multiply mode will yield the most interesting results. On this particular image, I like the Soft Light mode for a more subtle effect.


This will many times make your picture too dark or too light. Create an adjustment layer by going to Layers > New Adjustment Layer > Levels (or any other one which you might need). After you do that, you might want to check out the different blend modes again to see if you overlooked one because it was too dark or light. If you change anything, double-click the adjustment layer and make any changes to that if necessary.


Then, when you're satisfied with the result, go to Layers > Flatten Image, and then File > Save As (so you don't write over your old picture). Now it's ready for toning or any other adjustments that you'd like. See "How-To: Split Toning" or "More on Toning" for some tips on that.

Blend modes also have other applications which I'll discuss another time.

And, of course, if you use this method, I'd like to see your results in the Flickr pool.

Saturday, July 21, 2007

How-To: Make Redscale Film

Update: You can now simply buy ready-made redscale film.

Here's something completely different for you to try, if you like, and it can only be done with film. Sure, you could fake it in Photoshop, but that would take all the fun out of it. It's part of the whole lo-fi movement, which I'll talk about another day. This particular technique is called redscale, and the results look like this:
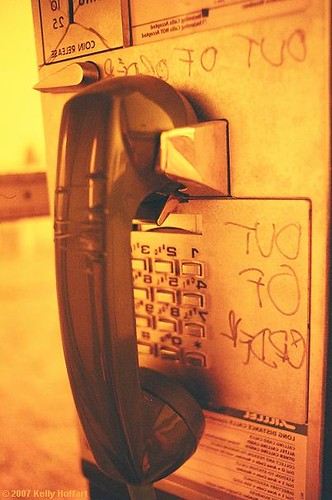
redrO fo tuO

In its simplest terms, this happens because you put the film in the canister with the wrong side facing up, so the wrong side gets exposed. It sounds kind of intimidating to anyone without any darkroom experience, but it's really quite easy, and I'll walk you through it. All you need is two rolls of film, some clear tape, and a pair of scissors.

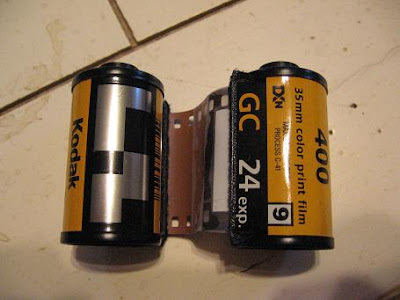
Step one: take a roll of film, and pull all the film out of it--but don't yank it too hard. You want to leave it attached to the spool. Then snip it with some scissors, leaving just a little bit, and throw away the exposed film.
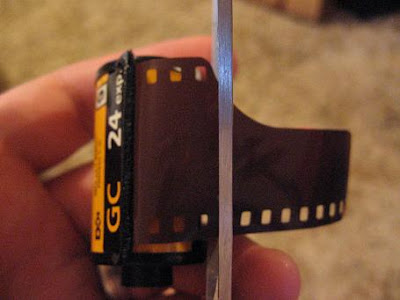

Step two: get your second roll of film, and cut off the leader.


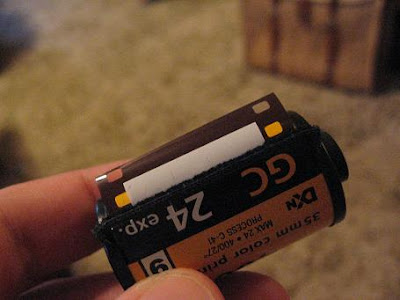
Step three: tape the two rolls together, but with opposite sides of film facing up.


Step four: roll the film into the other (the first) spool. Using your scissors might be a good way to do this. And make sure to do it in complete darkness.

Step--oh, wait, I suppose maybe you can't see what's going on in that completely dark room. Here's what it would look like in the light:
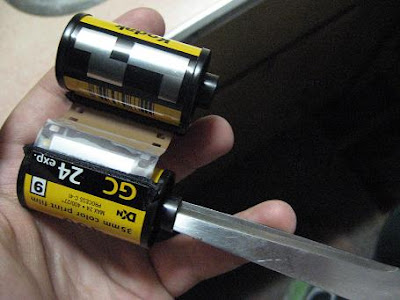
When you feel a bit more resistance, you can stop and come out into the light.
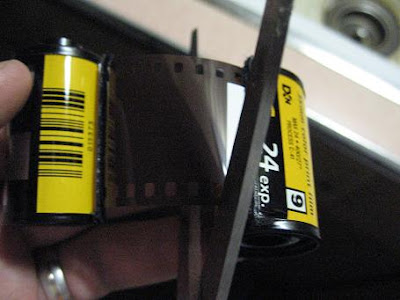

Step five: pull the spools apart a bit, so the film isn't stuck inside. Cut it off close to the now-empty spool, being careful to leave just enough so you can use this one as your empty spool next time. Put it in an empty film canister and label it, then put it somewhere you can find it next time.
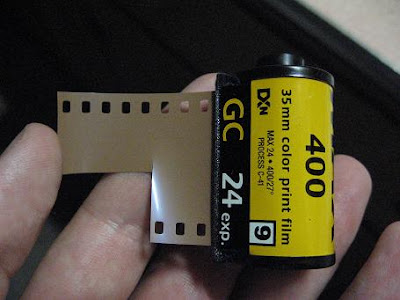

Step six: cut a new leader into your new roll of redscale film, and voila! There you have it!

Now, one thing to keep in mind is that you might want to overexpose everything by one stop. Other than that, there's nothing different about shooting it. When you take it in to get developed, make sure to tell them about the tape, so it doesn't gum up their machines. Another thing to think about is that different kinds of film and different lighting conditions will yield somewhat different results, ranging from a very much maroon tint to a strong yellow.

So what are you waiting for? Oh, I suppose maybe you want to see more results. Here is what some other people have done:


(by sterile)


(by fimdalinha, who was also using a film spoke technique, caused by using 35mm film in a modified medium format camera)
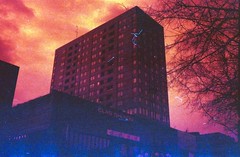

(by trxonspeed)

For even more, you can check out the Redscale Film group on Flickr, but be warned--they don't accept imitations: you must do it with real redscale film, not with digital manipulation.

Monday, July 02, 2007

A Challenge: Shoot Out the Window

An interesting challenge that you can try is to shoot out the window of a moving vehicle. Preferably, you should be in the passenger's seat of course, but I wouldn't say I've never taken a picture while driving myself.

To get anything worthwhile at all, you'll need to have your window rolled down. It will also need to be pretty bright out, so you may have to sacrifice light quality to do this. But if you have a steady hand, a smooth road, and you zoom in a bit (the stuff further away is less likely to blur), you can still do this with good light. Like in this picture:

Fields West of Seward, Nebraska

A few things to consider when doing this:
- You know how I've said that photography is 50% skill, 25% dedication, and 25% luck? Well, when you're doing this the dedication and luck take the forefront. But that's not to say there's no skill involved. You need to anticipate. And you need to be able to not hesitate as soon as you see the scene you want in your viewfinder.
- Watch out for telephone poles and lines, and watch out for signs. Simply zooming in can usually get rid of the telephone line problem.
- The scenery closest to you will blur, so think of it like depth of field.
- You may want to try looking to the left side of the road on your way to your destination, and think about which pictures you want to take. Then, on your way back, do the shooting.
- There is a Flickr group dedicated to this. Check it out!

Thursday, December 21, 2006

Quick Tips for Christmas Pics

Christmas is coming up soon, and everyone with a camera will want to take pictures of the festivities. Think of this as your assignment for the week.

Here are just a few tips:

- Don't take pictures of people unwrapping their gifts--take pictures of their faces when they see what they're unwrapping. You'll want to get the gift and the torn wrapping paper in the image as well to put it in context, but remember that the important thing is the emotion. Be ready at the exact moment of realization, because it's short. If you're using any automatic features, especially automatic focus, frame the image and hold the shutter button partway down until your camera figures out what it needs to do. That way you can finish pressing the button at the right time.

- For placement of faces in the image, don't forget everything you know about composition. Re-read the article on the golden ratio if necessary, because you'll want to put faces on a powerpoint (or cradle, in golden triangle terms).

- Try to get at least one picture of everyone present, but you don't necessarily want to pose them. Get as many people in each frame as you can, and try to make sure the Christmas tree is in the picture too.

- Take pictures before any of the presents are unwrapped, so you get all the wonderful colors and bows and so forth. Take pics of just the presents, presents and trees, presents and the people anticipating their chance to unwrap them (but with these last ones, again the emotion is paramount). Take pictures throughout the event, and make sure to get pictures of the wrapping paper carnage before it's all cleaned up.

- If there are kids around, take pictures of them playing with their toys before the wrapping paper is thrown out.

- You don't need to get a picture every time a gift is unwrapped. Sometimes it's best to take a picture of someone else who's watching another person unwrap a gift. They'll be less suspecting of the camera, so it's a great opportunity to get a candid shot.

- Look for strange angles. Maybe you can lay down under the Christmas tree after the presents have been removed. Or maybe you can sneak behind someone while they're opening their gifts to give the viewer of the image the feeling that they are the ones opening the presents. The possibilities are endless.

- Don't forget that you're a part of the family or circle of friends, too. Don't let your hobby as a photographer get in the way of having a good time and being with your loved ones.

- And last, but not least, don't forget the true meaning of Christmas.


(Painting by Giovanni Battista Pittoni, 1687-1767)

Friday, December 15, 2006

Opposing Viewpoints

Actually, I'm not all that interested in the subject of photography. Once the picture is in the box, I'm not all that interested in what happens next. Hunters, after all, aren't cooks.
--Henri Cartier-Bresson
The negative is the equivalent of the composer's score, and the print the performance.
--Ansel Adams

Wednesday, December 13, 2006

Alfred Stieglitz Quote

No assignment this week, as I am far too busy (graduation and anniversary within two days of each other). Instead, take the time to catch up a bit and reflect on the following:
Let me here call attention to one of the most universally popular mistakes that have to do with photography - that of classing supposedly excellent work as professional, and using the term amateur to convey the idea of immature productions and to excuse atrociously poor photographs. As a matter of fact nearly all the greatest work is being, and has always been done, by those who are following photography for the love of it, and not merely for financial reasons. As the name implies, an amateur is one who works for love; and viewed in this light the incorrectness of the popular classification is readily apparent.
--Alfred Stieglitz

(Alfred Stieglitz is widely regarded as one of the most important figures in the history of photography, not because he made any technological advances, or even because of his own respectable body of photographic work, but rather because he did much to promote photography as an art form. He is also well known for having been married to Georgia O'Keefe, although they didn't live together most of the time and were both known to be unfaithful to each other.)