How-To: Make Redscale Film
Update: You can now simply buy ready-made redscale film.
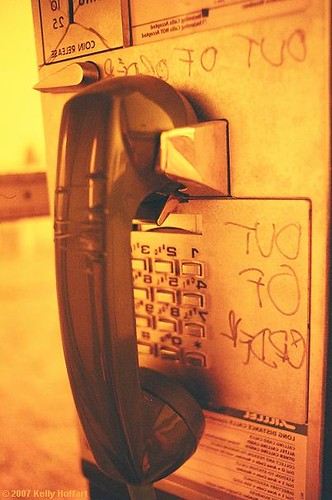
Here's something completely different for you to try, if you like, and it can only be done with film. Sure, you could fake it in Photoshop, but that would take all the fun out of it. It's part of the whole lo-fi movement, which I'll talk about another day. This particular technique is called redscale, and the results look like this:
In its simplest terms, this happens because you put the film in the canister with the wrong side facing up, so the wrong side gets exposed. It sounds kind of intimidating to anyone without any darkroom experience, but it's really quite easy, and I'll walk you through it. All you need is two rolls of film, some clear tape, and a pair of scissors.

Step one: take a roll of film, and pull all the film out of it--but don't yank it too hard. You want to leave it attached to the spool. Then snip it with some scissors, leaving just a little bit, and throw away the exposed film.

Step two: get your second roll of film, and cut off the leader.


Step three: tape the two rolls together, but with opposite sides of film facing up.

Step four: roll the film into the other (the first) spool. Using your scissors might be a good way to do this. And make sure to do it in complete darkness.
Step--oh, wait, I suppose maybe you can't see what's going on in that completely dark room. Here's what it would look like in the light:

When you feel a bit more resistance, you can stop and come out into the light.

Step five: pull the spools apart a bit, so the film isn't stuck inside. Cut it off close to the now-empty spool, being careful to leave just enough so you can use this one as your empty spool next time. Put it in an empty film canister and label it, then put it somewhere you can find it next time.

Step six: cut a new leader into your new roll of redscale film, and voila! There you have it!
Now, one thing to keep in mind is that you might want to overexpose everything by one stop. Other than that, there's nothing different about shooting it. When you take it in to get developed, make sure to tell them about the tape, so it doesn't gum up their machines. Another thing to think about is that different kinds of film and different lighting conditions will yield somewhat different results, ranging from a very much maroon tint to a strong yellow.
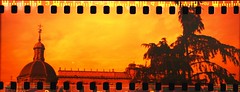
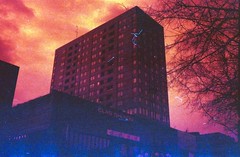
So what are you waiting for? Oh, I suppose maybe you want to see more results. Here is what some other people have done:

(by sterile)
(by fimdalinha, who was also using a film spoke technique, caused by using 35mm film in a modified medium format camera)
(by trxonspeed)
For even more, you can check out the Redscale Film group on Flickr, but be warned--they don't accept imitations: you must do it with real redscale film, not with digital manipulation.
posted by Full Metal Attorney @ 1:20 AM
67 comments
![]()

67 Comments:
That is something worth trying out!
I've never really even thought what happens when you expose the wrong side of the film.
Thank you for sharing!
PS: Thanks for your comment too :)
I'm glad that you made an english version of the techinque
thank you
This is awesome! I have to try it out sometime. Thanks! :D
You're very welcome! This is by no means my idea, and there were already instructions for this online--but they were in Italian. Luckily they had pictures, or I wouldn't have been able to figure it out. It was still kind of difficult, so that's why I wrote this English version.
nice... I have to try this... I joined the flickr group. what about the exposure time? should be the same than using the film in the "normal" way or should be longer? I use a 100iso colour negative film with a zenit122 camera.
cheers from Chile.
i'll definitely try this :)
Thanks for sharing this technique!
Instead of sacrificing film cartridges for redscaling, you can probably ask your local photo lab for discarded ones. Just make sure to get those with film sticking out so you can respool your fresh film into them. I was able to get hold of some.
Excited to try this very soon, and share the results!
To view my analog photography, visit
http://eazy360.multiply.com/photos
"Now, one thing to keep in mind is that you might want to overexpose everything by one stop."
kind of a newbie here..
what exactly does that sentence mean?
It means that whatever exposure your camera wants to make, it should be overexposed by 1 stop. Read this post for more detailed information. The easy rule is that some cameras have exposure compensation, and you'll need to consult your manual for that. If you have a completely manual camera, it's easier to explain. If you are using 400 ISO redscale film, set your camera to 200 ISO. If you can't do that, then determine proper exposure and then decrease shutter speed by one stop or increase your aperture by one stop.
ooh i wanna try this!:P
Nice, Thanks a lot for taking the
time to do this (;
i hope i got that right, i will know when i get the rolls back from print. mucho thanks!
Working at full service, professional photo labs, I used to see this quite often when folks would come in with their first ventures into large format photography. It was a common error with new 4x5 photographers to load their sheet film with the base side out, rather than the traditional emulsion side out (film code notches in lower right hand corner).
The results were generally disappointing, as they were not trying to induce the base color onto the image. The results were also about one to two stops underexposed, due to the inherent density of the film base. Also, the color cast imparted to the image would vary a bit from film type to film type. You will also notice a change in the overall sharpness of the image, due to the images trip through the base. Using a deep depth of field (large f/stop number) will help this.
If you have access to a large format camera, load some film "backwards", over expose by one or two f/stops to compensate for film base density and fire away! You will get large, manageable "redscale" images with excellent print potential.
F.Y.I. - This technique works well with out of date color film, as any traditionally unwanted color shifts due to the film's age are mitigated by the overall "redscale" effect.
can you achieve this effect with a point-and-shoot camera?
It doesn't matter whether you're using a point-and-shoot camera or an SLR, or any other kind of camera. You definitely have to be using a film camera. Obviously, you can't do this with digital. You could probably fake it (not perfectly, of course).
These instructions of course only apply to 35mm film. I know that others have done it with 120 and 220 film. Presumably, it's possible with any type of color film, but the instructions would be a lot different.
This is so exciting! Can't wait to try it.
One little q - is it possible to take just one roll of film, go to the darkroom and pull it all out, then snip the end flip it over and tape it back? Perhaps this is harder than it sounds?
That's absolutely possible. It's somewhat more difficult, because obviously you have to do it all in complete darkness (anyone with darkroom experience knows that amber light will expose film). You would have to figure out where to cut it and tape it on there straight in the dark, but it's certainly possible. The other disadvantage is that you won't have an extra roll to work with a bit easier the next time. But you're certainly welcome to try it.
Can i use a cassette (say 'A')with a litte left over film at the mouth (still attached to the spool), so that i can used with the fresh(unexposed)film (say 'B')with it, i.e., by sticking it with the little bit left over film of the cassette 'A'?
I'm asking so, b'cause i process B/W films (Dev. Tank) and usally cut off the film at last (as u may know)after the film has been loaded into the spiral. So thought of using those waste Cassettes for Redscale.
I'm not really sure what you're asking. It sounds like that's what I just described.
thanks for the help. what would be your opinion on using redscale film on a lomo fisheye? :)
I would think it's a great idea. It kind of defeats (or maybe trumps) the weird colors you get with a Lomo, but the vignetting and contrast would be nice. The fisheye effect would probably be quite spectacular and eerie with redscale.
thanks a lot :) i will try it out after hearing what you have to say about it.
wow that's meticulous but isn't that just regular film? what about with 120 film? can we use that technique too?
dunno why you go through all that trouble wasting money and time and precious film! that's very ambitious and pretentious. just shoot. that's what lomo's all about. stop making it complex cause it's not and isn't supposed to be.
Una:
I already wrote, "I know that others have done it with 120 and 220 film. Presumably, it's possible with any type of color film, but the instructions would be a lot different."
You have to do something with the paper to do it properly. I haven't worked enough with 120 to know exactly how to do it.
Estabien:
If you're not willing to experiment, I don't think you're really in the spirit of the lo-fi movement (of which Lomography is just a part).
Can you still have the film developed at WalMart or Ritz? Or do you have to develop it yourself?
can u use a red light
while u roll the inverse
fil into the new roll?
NO! You absolutely can NOT use a red light while working with undeveloped film.
estabien: ia with kelly, i think you don't really get lomo. it's not just about "dont think just shoot", it's about embracing imperfections and making them part of your photograph, accepting them, making them beautiful. idk. that sounded better in my head.
and anyway experimenting comes hand in hand with that. besides, you don't need to waste money nor time nor precious film. it took me less than 3 minutes to make my first roll of redscale film. also, you don't need to waste an entire roll of film. i got my first empty cartridge from the photo lab i go to, they'll have an abundance of them.
p.s. thanks, kelly! for writing this out in english.
Just a thought, but how about popping the top in a dark bag or darkroom, flipping the spool and rewinding it the other way? If you ever do your own bulk film loading it would be fairly simple to you, but obviously if you have never used a dark bag, it might be challenging. On the other hand, the dark bag has become an indispensable tool for me, so experience with it would be a useful skill. As far as the 120 film goes, just unroll it, flip it on the paper backing, roll it back on and re-tape it. If you want to use it in a 620 camera, you can kill 2 birds with 1 stone since you have to re-spool it anyway. 220 is simpler since there is no backing paper to deal with, just the paper leader strips at either end.
"When you take it in to get developed, make sure to tell them about the tape, so it doesn't gum up their machines"
ummm i'd probably end up sending in my film through the mail via snapfish, so I don't think i'll be able to tell them that. Would it really be a problem?
Yes, it is really an issue. But it's no big deal for them to take care of it, as long as they know, so you should write the instructions down somehow.
this is so cool! makes giving film cameras a shot worth a try!
very interesting.. i've been try your tips, but i'm failed..
but i've another version.. you can look at here.
This tutorial is excellent. I just finished making 4 rolls of Redscale using these instructions, and it was easy! I started off with an empty cartridge that I got from the Wal-Mart 1 hour lab, So I didn't even have to sacrifice a roll of film. Thanks for this tutorial, Now I have to go out and Shoot!!
this blog is awesome! i am trying this today. thanks.
This comment has been removed by a blog administrator.
Tried this today with FujiFilm ISO 200 film. It was cheap. I did a film speed test with a gray card, and the effective ISO using redscale was 25! That's three stops! I'm sure it varies with the film . . .
Thanks for your tutorial!
If I over expose this by one stop: lets say, shooting 400 at 200, what do i develop it at? 200?
this is an excellent but simple idea!
hello:
I am the administration from a flickr group called " Redscale Film 反轉菲林 ",I want to make a link to your article from my group! Thank You!!
I've been wanting to try out the Redscale effect. Thank you for posting this up :) it's quite intimidating though. Can you use a pinhole for this kind of thing? What camera did you use?
Actually, a pinhole is a VERY good alternative.
You could go to your local Goodwill or Salvation Army and pick up a couple of cheap 35mm cameras, and all you need to do is drill the right sized hole in the right spot in the back of the camera, and keep the lens covered. Then you can put ordinary film in the camera, shoot backwards, and voila, you have a redscale pinhole camera that's very easy to use.
Normally I load redscale film in my SLR, but I've seen the redscale point-and-shoot pinhole done before.
hi.. thanks for this post.. can the film be developed in walmart?
I had some problems with thistechnique. By using scissors you will wind the film in not tight enough. This resulted for me in one film roll which only went in 50% and one film roll which went in fine but has a lot of trouble getting out again..
However for my third roll I just used my camera to wind the film. It's simple.
1. Just make redscale like it's desribed here untill the winding part.
2. Put the canister where the film should go in in the camera.
3. Go to dark place like a toilet
4. Use your rewinder on the camera to get the film in and keep the roll where it's coming from in your hands.
I like to do it sitting, keeping my camera between my legs so I have one hand for rewinding and one to hold the other roll keeping it TIGHT!
Thank you for sharing your techniques!
I'm excited to try this new techniques with my photography.
It is really a great worthy one. It is very effective by applying your new technique. Thanks for sharing your nice experience with everyone. It is very easy to make redscale film easily by your method. As a photographer, this makes my work very easy.
hidden object games
Thank you for this. Helped alot!
Sebmeister
oh this is cool. but of course, one should be careful on doing this one to have the assurance of obtaining the best results. I've seen a lot of friends doing this kind of technique but they're doing it using digital, but no question the authentic redscale film looks better.
_______________
make your car cool, check your auto ac
What happenes when you use large format slide film in stead of color negative?
Many people use slide film for this technique, usually cross-processing it, and getting good results. Of course, slide film is less forgiving than negative film as far as exposure latitude, and large format film is very expensive--so you might want to experiment with 35mm slide film before you try it on large format.
Slide film won't give the same results as C-41. The reason it's called RED scale is that the film is being exposed through the film base which has an orange mask. Slide films have a clear base, negating the "red scale" effect.
No, that is incorrect.
Redscale DOES work with slide film, and has been done with both E6 and cross-processing. The reason it works has nothing to do with the backing on the film.
The reason it works is because ALL silver crystals (the light-sensitive part of film) are sensitive to blue light. See the Wikipedia article:
"C-41 film consists of an acetate or polyester film base, onto which multiple emulsions are coated. Each layer is only sensitive to a certain color of visible light. In the classic illustrative example, there are three emulsions: one is red sensitive, another is green sensitive, and the last is blue-sensitive. The top layer is blue-sensitive. Beneath the blue layer is a yellow filter, composed of dyes or collodial silver. All silver-based photographic emulsions have some sensitivity to blue light, regardless of what other colors they may be sensitized for. This filter layer serves to remove the blue light, which would expose the layers beneath it. Beneath the blue-sensitive layer and the yellow filter are the green and red sensitive layers."
Therefore, when you turn the film upside-down, ALL colors of light are exposing the red-dyed layer first, so everything that's blue becomes red, and the blue layer never gets exposed at all.
So you are wrong. It does work. I've seen the results.
Of course, they are all exposed, just in reversed order. I'm saying that the overall red color that one gets with C-41 is the result of the ORANGE mask that is in the film base (hence the original red scale Lomo name). That's why the exposure needs compensation with C-41. Calling the reversed E-6 Redscale may not be technically correct, but whatever. Have fun, anyway.
It's called redscale because it comes out red. This is true whether you use C41 or E6 film, and is primarily because all colors of light expose the red-dyed layer and none of the colors of light expose the blue layer.
No, the blue layer does not get exposed.
The anti-halation layer is the main reason you need to adjust the exposure with C41 film, but you also need to adjust it with E6 film.
Either way, it comes out red, and THAT is why it's called redscale.
2 pieces of advice when doing this technique.
First, when you are done shooting it's a good idea to flip the film back to it's original orientation. If you don't do this there is a good chance you'll end up with scratched negatives (it's happened to me a couple times and to many people I know).
Second, when they scan the negative (or you do) scan them upside-down or your final images will be inverted. This isn't usually a big deal but if there is writing in the pic it will be backward (like the payphone sample photo above).
Hope this helps.
@Vera the Fruit Hunter Yes, it is possible (I did it). Be careful, though, in the dark; I recommend tearing all your masking tape first, as masking tape gives off light when you pull its adhesive away from something.
Using the technique in the article, make sure you use the same kind of film canister for the can you wind it into, as developing times vary pretty widely with different types of film.
let's say you do that with an ISO 400 film, doesn't the film loose some speed or is it just as sensitive as before?
As I said, overexpose everything by one stop.
I made redscale film following this tutorial but was unable to actually load the film into my camera, I tried both my yashica t4 and olympus epic stylus, neither of which could recognize it. The motors on each pulled the film out, but the display screen kept reading empty. Anyone experienced a similar problem? Any good AF P&S cameras that work good with this DIY redscale film?
My film cameras are completely manual, so I don't have any experience with that problem. You might try turning off as many automatic functions as you can. Does anyone else have any ideas?
Oh well, after ruining a roll of film, I just loaded another one into my XA.
I'll use this in my holga 120n, which we all know can be modded to fit 35mm easliy. Since i can do pretty much whatever i want in that camera, i think it's possible to simply load it backwards, which would save on a little time. what do you think? i apologize if you already touched on this. Awesome article here, glad to finally see instructions in english :)
you could just use the slider and save the film, just a thought but I'll probably get bashed by all the open minded people hehe
this is just brilliant! and soooooo much better than buying redscale! thanks so much for the info! i cant wait to give this a try!
Best would be while putting in, just reel it from underneath instead of directly, the roll emulsion side will be on the opposite side.
Great guide. We are promoting a whole month of redscale film this February. http://believeinfilm.com/redscale
Post a Comment
<< Home