How-To: Vignetting
This Wikipedia article defines "vignetting" as "a reduction in image brightness in the image periphery compared to the image center." This is often used as a creative device in photography to draw your eye toward the center of the picture, and sometimes to create drama. Many photographers simply prefer vignetting on their images as a rule, rather than the exception. I don't think that's a good idea, but every once in a while you'll get a picture that already looks good with a centered composition (an unusual thing indeed) and you might want to make it even better with vignetting.
This week, instead of an assignment, I'll share the evolution of a so-so capture into a powerful, dramatic, and yet playful image in the tradition of Homeward Bound, and at the end of it I'll explain how you can add vignetting to your own pictures.
The original:
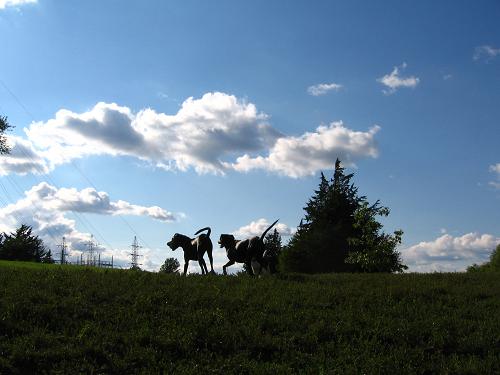
It's very difficult to get a good capture of dogs, especially when they're playing and moving around more than usual. Here I set myself up pretty well to get an interesting and dramatic composition. But as you can see, there's a lot of excess in this picture. I cropped the right side out, up to the tree. Then I cropped the top and bottom a bit, to retain the drama and eliminate unwanted details.
There was some dust on the lens, and since I was pointing in the direction of my light source (the sun) they showed up as white specks. I used the clone stamp tool to eliminate this problem.
Then I converted to black and white. To follow how I did that in more detail, read the article on silhouettes. In short, I went to Image > Adjustments > Channel Mixer, clicked the "Monochrome" box and for this picture I left the red channel at 100% because of the nice contrast it gave to this picture.
Vignetting
Then comes the step you've been waiting for. As I understand it, the latest version of Photoshop, CS2, has a special vignetting tool. But for those of you, like me, who are stuck using an older version of Photoshop, this tutorial will help you. I believe this trick will work in all versions of Photoshop beginning at version 5.The first step is to go to Layer > Duplicate Layer. This creates an additional layer identical to your background.
The second step is to darken the background layer appropriately. Click the eye next to your new layer in the layers palette, so you can see the original layer only, and click on the original layer. Now go to Image > Adjustments > Levels. Grab one of the rightmost sliders (either under the histogram or the output levels) and move it left until you think the edges are as dark as you want the darkest point to be. Don't overdo it at this step, or your picture will look cheesy rather than dramatic. Also, you can always go back and make it darker if you want, but making it lighter will be more difficult.
Now click the eye on your top layer again, and your picture will go back to normal. Make sure you click on the top layer in the layers palette as well, so we can be sure you're working with that layer and not another one.
The next step is to add our layer mask. For this, you'll want the elliptical marquee tool. This should be the top left icon in the toolbox palette. If a different marquee tool is there, such as the rectangular marquee, you'll have to hold down that button and a smaller window will open where you can select the elliptical one. Now, use that tool to select the area of your picture that you want to stay normal. In other words, everything outside it will fade as part of the vignette. After you're happy with your selection, look at the layers palette again. There are several tiny little icons at the bottom of it. Put your cursor over each one and wait for the little help message that says "Add Layer Mask." It should be the second from the left. Click that one.
Now you'll have a hard line between your regular-looking picture and the darker area around it. This isn't very pleasing to the eye, so let's make it into true vignetting.
Now, to the final step. On your top layer in the layers palette there will be two little thumbnails. Click on the one to the right (the plain white box), which is the layer mask itself. Then go to Filter > Blur > Gaussian Blur. Make sure the preview box is checked. Now, mess with the radius until there is an amount of fade that you like, and then click OK.
And that's it! You have your dramatic vignette. If you want to adjust things, undo the gaussian blur to change the amount of fade, or go back to the original layer and make it darker if you want. You could, I suppose, change your original layer to all-white or all-black, but to me that looks kind of corny. But again, some people like that, and they might even put some flowery, frilly stuff around in the empty space too. But that's not for me.
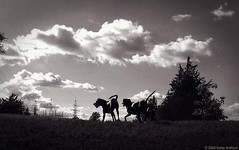
Here's my result:
If you add vignetting to your photos, why don't you share it with the group?
posted by Full Metal Attorney @ 9:06 AM
1 comments
![]()

1 Comments:
I must admit to using (subtle) vignettes a fair bit.
Personally I prefer to create the layer mask before darkening the background layer, so you can see what it will look like when you're doing the darkening.
There are lots of other different ways of doing the layer mask too. I often just do a radial gradient fill. You can also make effective use of inverse vignettes by lightening rather than darkening; this is particularly effective on shots of mist and fog.
Post a Comment
<< Home