Shedding Light On Dark Images
Hello, everyone! I'm Khorbin, the new Photoshop geek. My philosophy is that if you don't take a perfect picture every time, then that's ok. As they say, we'll edit it out in post-production.
Among the many powerful features of Photoshop, the ability to lighten or darken an image is certainly one of the most useful. As with nearly everything in PS, there are several ways to go about adjusting the light in your photos. Let's take a look at a few!
Before we begin, I should note a few things. I'm using Photoshop CS2, the most current version. Don't worry, though, if you are still clinging to an older version. Most of the things I'll talk about will work in much older versions of PS. Also, I'll assume that the reader is fairly new to Photoshop, so if you aren't, then please sit quietly until the rest of the class has caught up to your uber PS skillz. I'll also try to throw in a bunch of keyboard shortcuts, tips, tricks, and alternate ways to do things, so it's probably worth a read even if you aren't a newbie.
The Challenge:
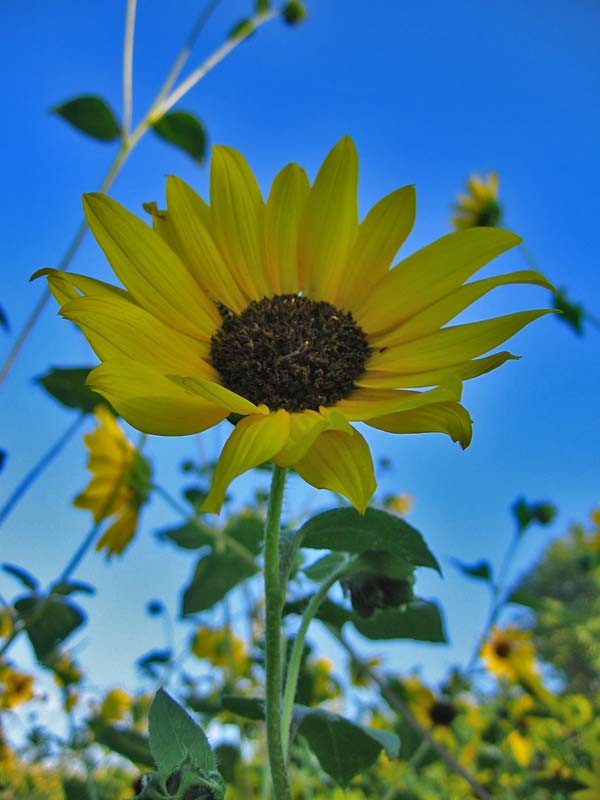
Kelly approached me with this image:
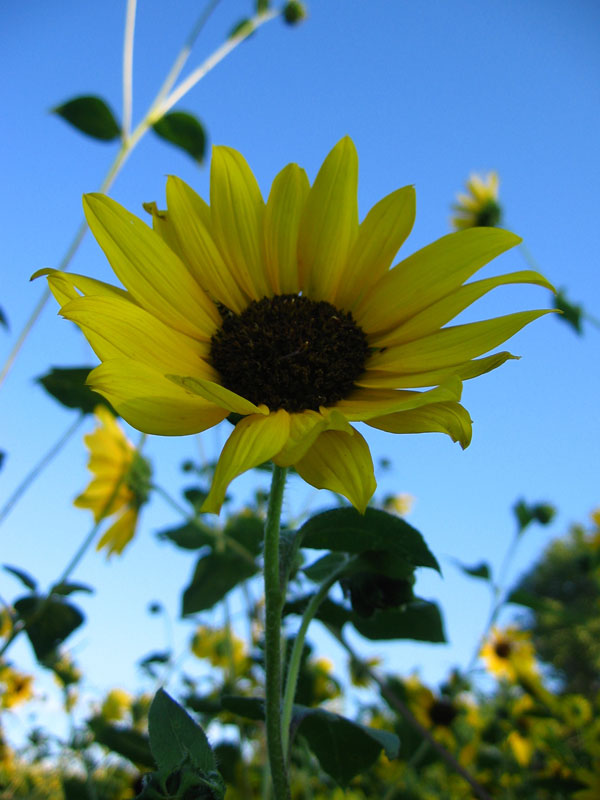
The main flower in the picture (specifically, the middle circle) is too dark, and lacks detail in some spots. Let's open it up in PS and see what we can do!
The Interface:
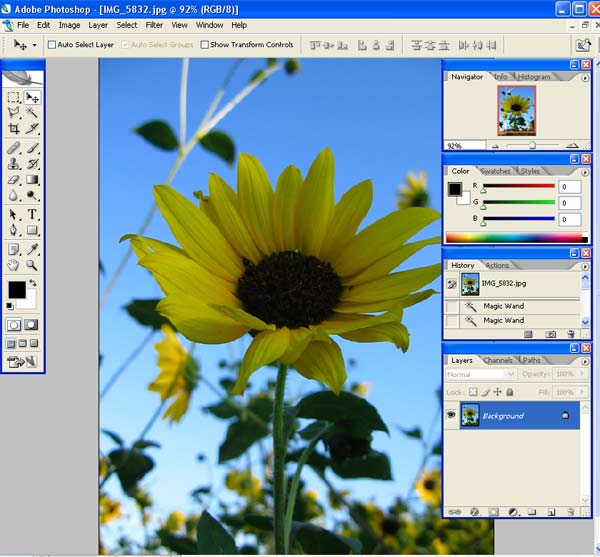
The above image shows the main interface for Photoshop. If you've never used PS before, it may look complicated, but don't worry. The average user can more than likely get by with very little of it and still get a lot done!
The first thing I always do is to create a copy of the background layer. This is for two reasons. First, if you want to see the original picture at any time, all you have to do is hide the layer that you've done the work to, and it's there! Second, the background layer is pretty limited in what you can do to it, so it's always a good idea, just in case. To do this, grab the layer labeled "Background" in the bottom right box, and drag it down to the icon at the bottom of that box that looks like two squares (the "create new layer" icon).
Brightness/Contrast:
The easiest way to adjust light and dark in the image is to simply use the brightness/contrast controls, which are located (in CS2) under the Image menu, under "Adjustments," and then click on "Brightness/Contrast." However, on this particular image, this won't work very well. Go ahead and try it, and you will see that you really can't lighten the flower effectively without lightening the entire rest of the picture way too much!
Levels:
The next tool I'll talk about is a bit more complex, but much more useful in common situations like vacation photos where some jerk put the sun behind you in the shot. Once again, use the Image menu, and select "Adjustments." But this time, click on "Levels." Alternatively, you can just hit CTRL-L to do the same thing. Either way, you will get a dialog box that looks like this:
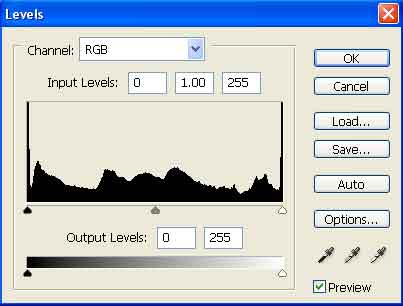
The black chart-thing is called the "Histogram" of the image. It shows the distribution of light and dark tones. If the histogram is squashed to the right side, the image is overexposed. If it's to the left, the image is underexposed. Either way, you will typically want the outer arrows to go close to where the black part of the histogram begins and ends. Moving the right arrow will make the image lighter, and moving the left one will make the image darker. The middle arrow adjusts the midtones. You can also adjust the Red, Green, and Blue channels individually, if you want, but for this one, I stuck with the standard. For this particular image, sliding the middle arrow to the left seemed to produce the best picture. Here's what I got just by using the levels, and about a minute of moving arrows:
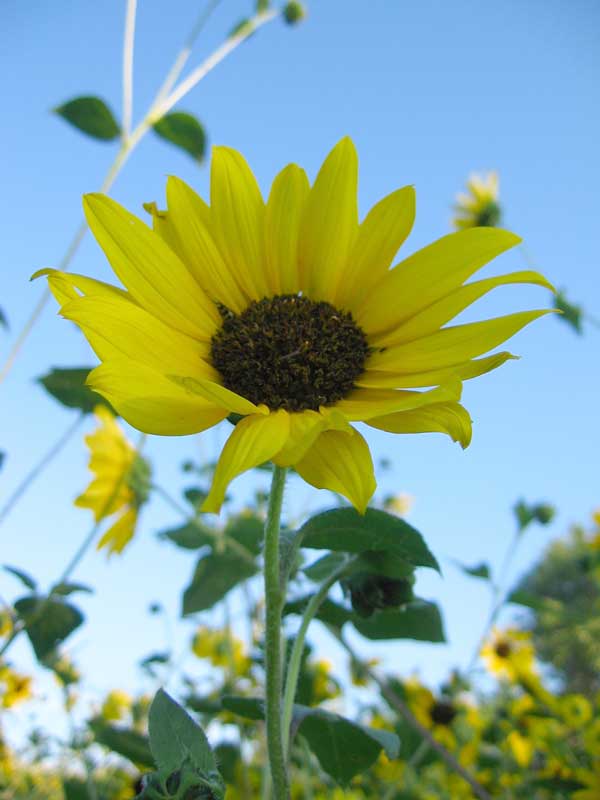
A definite improvement, but to really make the picture look good, we need to go into a bit more depth.
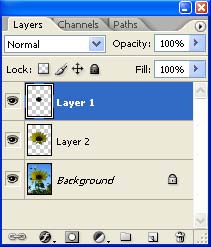
Layers:
The last two methods both share the problems of affecting the entire image. To fix this, we will use layers, and adjustment layers. If you don't know what layers are, imagine clear sheets of plastic that can be drawn on, and then stacked on one another. You can see all the way through to the bottom layer, so long as none of the layers above it have been "drawn" on. Each layer is independent from all of the other layers, so you can apply the things I've already talked about to a single layer, or if you want, to all of the layers. This is what I'll call the "layers panel," "layers pane," or "layers box."
Probably the easiest way to select what we need in this case is to use the Magic Wand tool. Find the icon in the top section of the toolbar on the left side of the screen, or simply press the "w" key. Several options come up directly underneath the top menu bar. One of them should be "Tolerance." Change the value in the box to about 20, and click in the dark area in the middle of the flower. Most of the dark area should now be selected. Hold shift to add to the selection, and click on the parts that weren't caught by the magic wand again, until you get the entire dark part selected.

Quick Tip:
Instead of holding down shift to add, you can change the settings. Just to the left of the tolerance setting is a group of icons that affect selection. The first is "New Selection," which gives you a new selection every time you click the wand. The second is "Add," and the third is "Subtract." These obviously add to or take away from the selection. The fourth, if it's there, is "Intersection," which I hardly ever use. It selects only the intersecting parts of the current selection and whatever you select next.
However you do it, select the entire dark part of the flower, and right click on it. On the context menu that comes up, click "Layer via Copy." This will create a new layer in the document, which you can change independently from the rest of the picture.
Repeat this process for as many different layers as you want. I did three on this picture: one for the background, one for the flower (including the dark center part), and one for the center part alone. Remember that the more effort you put into selecting the layers, the better this will turn out. Make sure you go to the layers pane and select the background layer when selecting, or else you won't be able to select properly. When you've got all of your layers, arrange them on the layers pane by simply dragging them up or down, so that the middle dark part is on top, followed by the one with the entire flower, followed by the background image.
Adjustment Layers:
Now, let's talk about adjustment layers. With adjustment layers, each effect is created in its own layer, which you can move around on the layers pane to affect different layers. Adjustment layers can affect every layer below them, or just the layer directly below them. They are great for when you do something that you may want to take out later, because they don't actually affect the image.
First, select the center image, and click the little icon at the bottom of the layers panel that looks like a circle that is half black and half white. Select "Levels" from the pop-up menu, and do basically the same thing you did last time you edited the levels. Notice that a new layer has been created on top of the layer that was selected. This adjustment layer will affect all of the levels below it, which is not desirable in this case. We want it to affect only the center part. Hold the ALT key, and move the mouse to the bottom border of the adjustment layer in the layer pane. Your cursor should change to two black circles. Click while still holding ALT, and the adjustment layer will move to the right, with a little arrow pointing down appearing to the left of it. This means it is affecting only the one layer. Good work! Repeat this process for all of the other layers, lightening or darkening them according to what looks best to you.
Quick Tip:
If you can tell where one layer starts and another begins, you probably should make them a bit less obviously different. Try adjusting the "opacity" setting for the top levels in the layer panel.
Here's what I got from it (I didn't spend too much time on selecting, but you get the idea):

Shadow/Highlight:
One final method I want to talk about is using the "Shadow/Highlight" feature. This feature is new to CS1, so if you have an older version, you won't be able to use it. Upgrade ASAP if you plan on doing this kind of thing regularly, because it's certainly the easiest and most effective way, hands down.
Start over with the original image (no layers are really needed for this image, but if you wanted to, you could use them.) From the Image menu, select Adjustments > Shadow/Highlight. You can immediately see the improvement in the image, but it gets better. I left the Shadow setting at 50%, and dragged the Highlight setting up to 50% as well. I ended up with this:
So there you have it. You now know three very good and relatively easy ways to adjust the brightness of an under- or over-exposed image! As a final comparison, here are all of them side-by-side.
The Results:
Original:
Levels only (~30 seconds):
Levels with Layers (~10 minutes):
Shadows/Highlights (~30 Seconds, Requires CS1 or higher):
Now go find those photos you'd passed up because of bad lighting, and get to work!
posted by adaminaustralia @ 5:01 PM
2 comments
![]()

2 Comments:
Good work! I think we'll be hearing from you again. The layers-adjusted image was the best of the bunch, since the second one lost the true blue of the sky. Still, I'm going to criticize here: the petals were actually what needed the most work, I thought, but I'll be a little clearer with that the next time I give you an assignment.
Also, it's a bit hard to follow when I don't actually have PhotoShop sitting in front of me. I'll print it off and try it out myself later.
Of course, feel free to use your own photos and do whatever work you want. You are most certainly a welcome addition to the blog!
If you want to keep the sky from being too blue, just leave the highlight setting at 0%, or just above. That's the best part about the shadows/highlights function - it's really quick & easy to get what you want.
Post a Comment
<< Home