Proper Exposure
Most people, even some very talented photographers, always use their camera in fully-automatic mode. When you shoot, I want to invite you to step out of that habit. You'll learn a lot, and you'll get a lot more control over your photography.
But to do that, you'll have to understand how it works.
An exposure is determined by three things: film speed (or ISO, or ASA), aperture, and shutter speed. If you don't have your camera with you, I recommend you go and grab it and try to find everything I'm talking about here. This is a long post, but this is absolutely essential knowledge, and it doesn't do you any good to understand only one of them, because they must work together.
Film Speed, or Digital ISO
A higher-speed film has more noticeable grain than a lower-speed film, but the higher one needs less light, and so it's faster. This is because film is made up of tiny crystals of some kind of silver compound. (Don't ask me what it is exactly, I'm not a chemist.) The larger the crystals, the faster the film, but the more noticeable they will be."But wait!" you say, "I use a digital camera." Whether you know it or not, your digital camera has an ISO setting on it that simulates this effect. (Don't ask me why, I'm not an electrical engineer.) You should be able to adjust it manually, within limits. My digital camera, a Canon Powershot A520, has ISO ranges from 50 to 400. You can see the difference between them here:
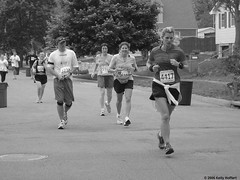
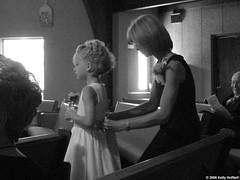
The first shot was in the 50 ISO setting, and the second one was in the 400 ISO setting. You'll be able to notice the difference more clearly if you click the images to enlarge them. The second one is much grainier. I was forced to switch the ISO setting because of the low light in the church--I was concerned about camera shake. More on that later.
One of the benefits of using a digital camera is that you can adjust film speed between each shot, if you want. But you may not be able to adjust it if you're in full manual mode, so get out of it!
Aperture
The aperture on your camera (represented by an f number, such as f2, f11, or f22) represents the amount of light that your camera allows to reach the film or digital sensor. The lower the number, the more light it lets in, and the faster your exposure will be. Typically, f22 is the smallest (and therefore the slowest) possible aperture, and it lets the least light into your camera.Like film speed, aperture affects proper exposure. But instead of affecting grain, aperture affects depth of field (or DOF). Depth of field represents the depth of the focal plane of the image. Sounds complicated, but it isn't. A faster aperture, such as f22, will have more of the image in focus. Many people like to operate that way, because they like images with a lot in focus. The downside of it, though, is that it makes the image appear to be more flat. I don't like this effect personally, although many people do. So I don't have any examples from my own work to illustrate this effect, but you can check out the f/22 group on Flickr to see some examples of flat pictures. Also, my digital camera is a point-and-shoot, so it only goes up to f8. If you have a point-and-shoot camera (not an SLR) it probably also doesn't go up to f22.
A wide aperture has the benefits of being both faster (because it allows more light into the camera) and of giving the picture the appearance of depth. This can be illustrated with this picture I took with my SLR film camera:
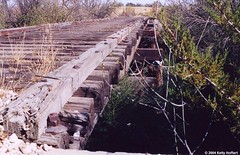
Note how the wide aperture makes the bridge appear to have more depth, to be disappearing into the background. Here's another example, this time in black and white from my digital camera:
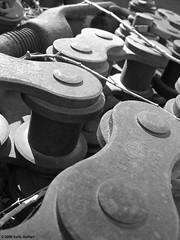
You may notice as you mess around with your camera that if you zoom in, you can't get as wide of an aperture as when you are fully zoomed out. This is normal, so don't worry about it.
More on depth of field and its uses in another post some day.
Shutter Speed
The final setting on your camera that affects exposure is shutter speed. This is how long the shutter stays open to allow light into the camera to hit the film or digital sensor. Like aperture and ISO, the shutter speed also has an additional effect: blur. Most of the time you'll want as fast a shutter speed as possible, especially with action shots like this one (at 1/800 second):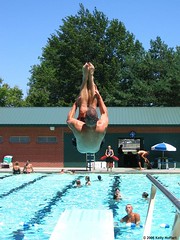
But often, a slow shutter speed can be used to great artistic effect. Just check out the lights on these cars in this 2-second exposure:

Longer exposures are also very pleasing if you are taking pictures of running water, like waterfalls or streams. Professional fine art photographer David Fokos (a favorite of mine) uses exposures ranging from 20 seconds to a full hour to magnificent effect. But your camera may not be able to do that (my digital will not, and with my SLR I'd have to hold down the button).
The catch is (there's always a catch) that with slower shutter speeds, you won't be able to hold your camera by hand. When you shake the camera, you ruin the picture. How do you know when your camera is going to shake too much? A good rule of thumb is to take the inverse of your lens length, and if you go below that it's no good. For example, if you are shooting at 50mm zoom (fairly standard) you can shoot by hand at 1/50 of a second, and if you're at 28mm zoom (wide angle) you can go all the way down to 1/28th of a second. However, if you are zooming in really long--say, 100mm--it gets more difficult to hold the camera steady, and you'll have to go up to 1/100 of a second.
Combining All Three
Every time you take a shot, you're going to have to take into account all three: ISO, aperture (or f number), and shutter speed. Generally, it's best to set your ISO as slow as possible (lowest number) and, for the most part, forget about it. Then take into account your aperture. Do you want a shallow depth of field (for a greater feeling of depth) or more detail? Remember, a wider aperture (lower number) gives a greater feeling of depth and a shallower depth of field. And then, if you're shooting in fully manual mode, switch your shutter speed to whatever your light meter tells you is correct. Bracket if you're not sure (more on that another day).Of course, it's not cheating if you use a priority mode on your camera. I use the aperture priority mode on my digital camera almost exclusively. It allows me to set the ISO (I almost always shoot at 50) and the aperture (I shoot as wide as possible) and it will automatically choose the correct shutter speed for me. If I don't agree with it, I can adjust the exposure compensation on my camera as well. You can also use a shutter priority mode on your camera, but I find this to be less useful.
It should be noted that each standard aperture or shutter setting is called a "stop". You will often hear an aperture setting referred to as an f-stop. Each step towards a larger aperture is called a stop, and lets twice as much light in. So f11 lets twice as much light in as f22. Likewise, each successively slower shutter speed is also called a stop, and lets twice as much light in. So 1/60 lets in twice as much light as 1/125 (the numbers are rounded off, that's why the math doesn't always work). Similarly, each basic film speed, as you go lower, requires twice as much light to achieve the same exposure. So 50 ISO requires twice as much light as 100 ISO, or four times as much as 200 ISO.
With this knowledge, we know that all of the following exposures are the same (in terms of how much light they put on the film or sensor):
50 ISO - f5.6 - 1/250
50 ISO - f11 - 1/125
50 ISO - f22 - 1/60
100 ISO - f5.6 - 1/500
100 ISO - f11 - 1/250
100 ISO - f22 - 1/125
200 ISO - f5.6 - 1/1000
200 ISO - f11 - 1/500
200 ISO - f22 - 1/250
400 ISO - f11 - 1/1000
400 ISO - f22 - 1/500
Next time you shoot, I hope you try to use this knowledge to your advantage. If you don't break out of your shell and make some mistakes, you'll never improve!

3 Comments:
I've tried that, but I just keep getting confused. I guess I just need to take about 20 pictures of the same subject with different settings of all 3 items and see how they all look different.
I used to get confused a lot with it too. Your light meter should help a lot. On my SLR, the light meter shows green if it thinks it's right, a red light in the bottom if it's underexposed, and a red light in the top when it's overexposed. If the red light is high, you've got to increase shutter speed (e.g. go from 1/60 to 1/125) or decrease your aperture (e.g. go from f11 to f22). If it's less confusing for you, think of it as increasing your f-number, so you always increase if over-exposed and decrease if under-exposed.
Yeah, it still sounds confusing. But practice makes perfect!
I would try to find my manual, if I were you. If you have a Canon, I can give you a little help (and other manufacturers sometimes copy them in some ways, so it may transfer over). To find aperture priority mode on a Canon, you generally turn the mode selector to "Av". On mine, to change the aperture from that point, you press the left or right buttons (the same ones that you use to cycle through when you're looking at pictures you've taken). If you have an SLR, you can switch to aperture priority mode and then I believe you will adjust your aperture on the ring around your lens, the one closest to the camera body.
I hope this helps. Some point-and-shoot cameras, however, don't give you this much control.
Post a Comment
<< Home