How-To: Floating in Space
In lieu of giving an assignment this week, I'll explain how I did a photo project, so that you can do something similar if you want. For this one, I wanted to take a small subject and completely isolate it from the background. This way, it really pops.
You can do this with anything small enough so that you can put a solid-color background behind it. You might even be able to transfer some of what you learn from this post to other contexts.
 First, decide what your subject will be. I chose a sea shell. I did make one mistake, though. You should pick a background that contrasts very well with your subject. Since the shell had warm tones, I should have used a blue shirt. But I did get by with the red one. Put your subject on a background that contrasts with it. You could use a t-shirt, or construction paper, or whatever else you have available.
Frame your picture so that the subject fills the entire frame. Don't worry about composition, because with this project it'll be easy to change that in post-production. But do get a good angle on your subject. Because of the way I wanted it to turn out, I underexposed the shot by 2/3 of a stop, but that might not always be what you want to do.
Now that you have your original picture, take it into Photoshop. Use the magic wand tool, and click in your background. If this doesn't select all of your background, increase the tolerance. If it selects part of your subject, decrease the tolerance. As soon as you've selected as much of the background as possible without selecting any of your subject, hit the "delete" key. Now, you may need to go in and clean up the edges a bit by selecting a few pixels here and there and deleting them. Do this at 100% magnification, and go over the whole picture meticulously.
Now, zoom out again. If you don't like the white background it gave you, fill the area with whatever other color you want. If you want to change the composition, increase the size of your canvas, move the subject wherever you want it, and fill the remaining area with the same color you used before.
Now, I used a black background. You don't have to, but you should probably use either black or white if you want the picture to be black and white. If you want the picture in color, you need read no further. You have your pic! But if you want a high-contrast black and white like I do, read further.
Go to Layers-->New Adjustment Layer-->Hue/Saturation. Click OK, then click OK again. Go back and create another layer: Layers-->New Adjustment Layer-->Hue/Saturation. Click OK, but this time take the saturation slider all the way down to 0 and then click OK. Change the blend mode to color (in your layers palette, there should be a drop-down menu that says "Normal"; just click that and find "Color"). Double click on the first layer I told you to add, and mess with the hue slider until you get a look that you like.
Here's my result:
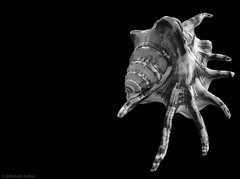
(this is available through Art.com and Fotolia)
Now, if you do this, show me what you get!
posted by Full Metal Attorney @ 9:33 AM
3 comments
![]()

3 Comments:
Oh my goodness, Kelly. I love this one, too!
Dad gum it, I'm torn now!
:)
I'm terribly sorry for making photos that you like. Thanks!
Yeah, Kelly is such a jerk.
Always taking pictures... of stuff... and things. The things are the worst. Oh, how I loathe him.
Post a Comment
<< Home